
Several bloggers have blogged about the cheesecake thumprint cookie lately and it made me curious. I wanted to try it. So, I searched around on the internet and finally found a recipe.
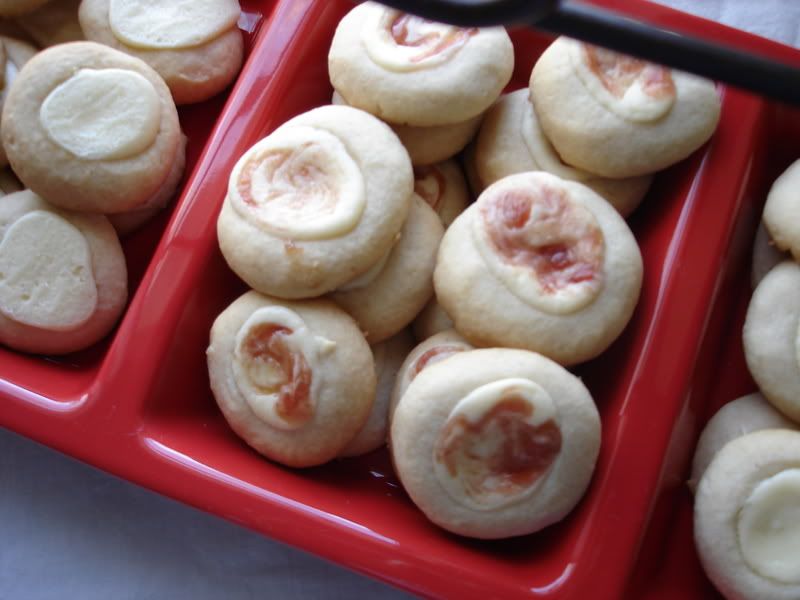
I am happy to say that these are delicious. They are so easy, but do require a little bit of "babysitting," as my future mother-in-law put it. My dad says that he isn't crazy about cheesecake, but that he could pop these babies all day long. I made them for our Christmas Cookie Swap tomorrow with the girls from work. Yay! Two thirds of them are plain, but I used red plum jam to make the other third "fancy" and marbled the cheesecake. They are BEAUTIFUL!
I highly recommend using a quality cream cheese. Cheaper cream cheeses tend to have too many fillers (and set harder). I doubled this batch and it made it easier to measure. (1 block of cream cheese is 8 oz.) :-D
Cheesecake Thumbprints
Makes about 30
These cookies are best eaten after they have been refrigerated overnight. Allow them to sit at room temperature for twenty minutes before serving.
4 oz cream cheese, room temperature
1/2 cup sugar
1/4 teaspoon salt, plus a pinch
2 large egg yolks
1-1/2 teaspoons sour cream
1/8 teaspoon pure vanilla extract
½ teaspoon pure vanilla extract
2 sticks (1 cup) unsalted butter, room temperature
2 cups all-purpose flour
In the bowl of an electric mixer fitted with the paddle attachment, beat cream cheese on medium speed until light and fluffy, about 3 minutes, scraping down the sides of the bowl as needed. Add 1/4 cup sugar and pinch of salt, and beat until smooth, about 3 minutes. Add 1 egg yolk, sour cream, and 1/8 tsp vanilla; beat until smooth. Transfer to a small bowl, and refrigerate for about 30 minutes.
Preheat oven to 350F, with racks in the upper & lower thirds. Line two baking sheets with Silpat or parchment; set aside. In the bowl of an electric mixer fitted with the paddle attachment, beat the butter and remaining 1/4 cup sugar on medium speed until well combined, 1 to 2 minutes, scraping down the sides of the bowl as needed. Add remaining 1/4 teaspoon salt, ½ teaspoon vanilla and egg yolk; beat to combine. With the mixer on low speed, gradually add the flour, mixing until just combined.
Shape level tablespoons of dough into balls, and place on prepared baking sheet about 1 inch apart. Using the lightly floured end of a thick wooden spoon handle (or your thumb), make an indentation in the center of each ball.Bake 10 minutes, remove from oven and make indentations again. Rotate sheets, return to oven, and bake until edges of cookies begin to turn golden, 7 to 9 minutes more. Transfer cookies to a wire rack to cool completely.
Using a small teaspoon, fill the center of each cookie with about 1 teaspoon cream cheese filling, mounding it slightly (if you’re adept with a pastry bag it’s much neater using that method... otherwise, stick with the teaspoons or a self-release truffle scoop). Return cookies to the oven, and bake until the filling is firm, 7 to 8 minutes. Transfer cookies to a wire rack to cool completely. Refrigerate in an airtight container, layered between waxed or parchment paper, at least 4 hours before serving (cookies can be refrigerated overnight).
 Chocolate variation: In a heatproof bowl set over (but not touching) simmering water (or using a microwave and 10 second increments, stirring between), melt 2 oz semisweet chocolate; let cool. Follow instructions for above recipe, adding melted chocolate (not hot, cooled slightly too room temp) to butter mixture along with the egg yolk and salt. Replace 3 tablespoons of the flour called for with cocoa powder, whisk flour and cocoa powder well to combine evenly before proceeding with recipe. The edges of these cookies will be firm to the touch when baked.
Enjoy!
No comments:
Post a Comment